Table of Contents
Available with Enterprise
Trigger events are one of the two essential components of automations. The events trigger different types of actions , which you can define individually for each automation. This article provides you with an overview of the different types of triggers.
Available automation triggers
In the latest version of SeaTable, there are a total of four different triggers to choose from:
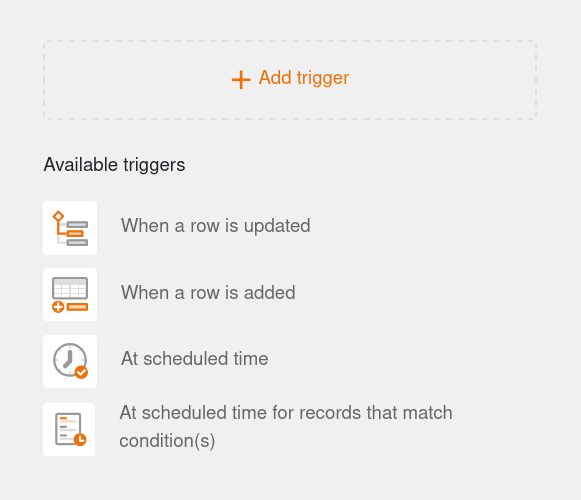
- When a row is updated
- When a row is added
- At scheduled time
- At scheduled time for records that match conditions
Trigger settings
To create or edit a trigger, click on the corresponding box in the central area of the automation editor. The trigger settings then appear on the right.

- You can first change the trigger using the drop-down menu. To do this, select the desired trigger event.
- Then define the table and the view in which the automation should take effect.
- Depending on the type of trigger, you can make further settings, e.g. monitored columns, conditions for triggering or the time of triggering.

Automation trigger: When a row is updated
If you select this event as a trigger, the corresponding automation is triggered each time a value is changed in one of the monitored columns and a row in the selected view meets certain conditions after editing. If you want the trigger to fire every time a change is made, do not add any conditions.
For the Conditions, you can define individually for each column what the corresponding value must look like after editing in order for the automation to start. As part of this, you can decide whether all or only selected columns in the view should be monitored for the occurrence of the trigger event.

If you select this event as the trigger for an automation, you can choose from the following automated actions:
- Send notification
- Send app notification
- Send e-mail
- Add record
- Lock record
- Modify record
- Add links
- Add record to another table
- Run Python script
- Run AI
Automation trigger: When a row is added
If you select this event as a trigger, the corresponding automation will be triggered every time a new row is added in the selected view. In addition, you can further restrict the occurrence of the event by defining conditions that the new row must fulfill.

In the conditions, you can specify individually for each column what the corresponding value must be for the automation to start. If you want each new row to trigger the automation, do not add any conditions.
If you select this event as the trigger for an automation, you can choose from the following automated actions:
- Send notification
- Send app notification
- Send e-mail
- Add record
- Lock record
- Modify record
- Add links
- Add record to another table
- Run Python script
- Run AI
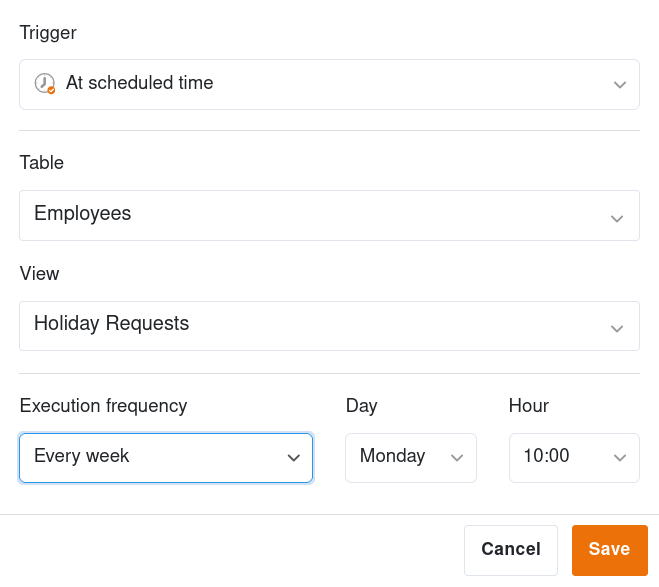
Automation trigger: At scheduled time
If you select this trigger, you can then define a time at which the automation runs daily, weekly or monthly.
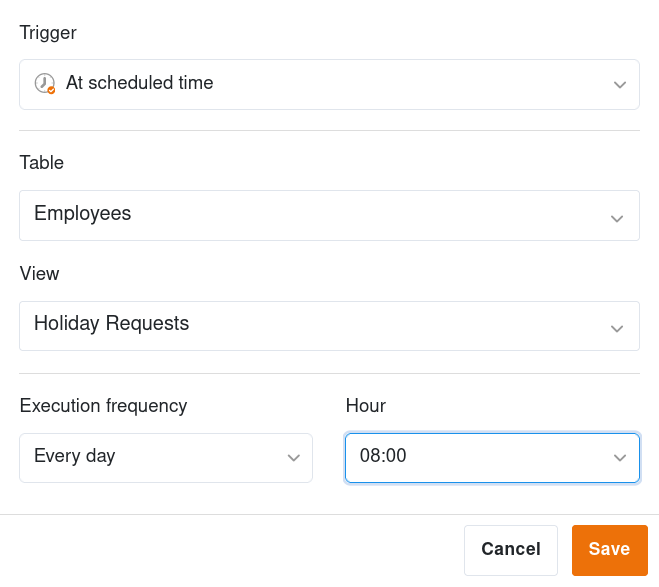
While you can only specify the time for a daily automation, you can also specify the day of the week for a weekly automation or the calendar day for a monthly automation.
If you set this trigger for an automation, you can choose from the following automated actions:
- Send notification
- Send app notification
- Send e-mail
- Add record
- Add links
- Run Python script
- Run AI
- Run data processing
- Generate PDF from document and send
Automation trigger: At scheduled time for records that match conditions
With this trigger, you specify a time congruent to the previously mentioned trigger at which the automation is triggered daily, weekly or monthly. You can also limit the rows that are affected by this trigger event.
For the conditions, you can specify individually for each column what the corresponding value must look like for the automation to be executed at the specified time.

If you select this trigger for an automation, you can choose from the following automated actions:
- Send notification
- Send app notification
- Send e-mail
- Lock record
- Modify record
- Convert page to PDF