Table of Contents
Gmail, Google’s popular email service, can be used to send emails from SeaTable. Authentication against the Google account can be done either via an app password or via OAuth. OAuth is Google’s preferred authentication method, but is also much more difficult to set up. (Authentication via user name and user password is not possible with Gmail).
Authentication via app password
An app password is a 16-digit passcode that apps or devices can use to authenticate themselves to Google and thereby gain access to your Gmail account. You can create app passwords in your Google account . App passwords can only be used for accounts that have two-step-verification enabled.
Creating an app password
- Open Google’s app password management - log in to your Google account when prompted.
- Enter a name, e.g. ‘SeaTable’, and click on Create.
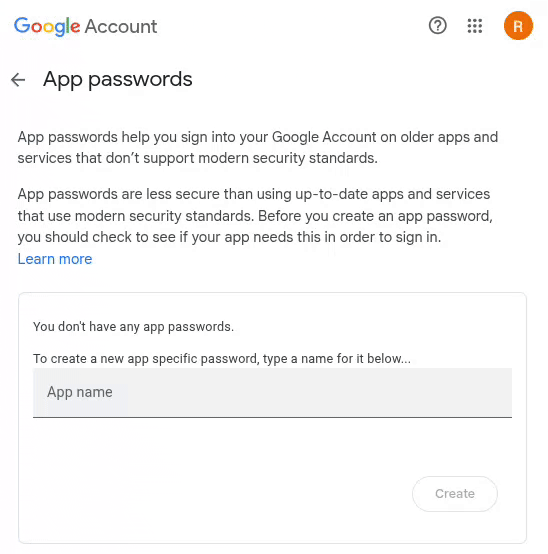
- Copy the generated app password to the clipboard.
Creation of the email account in SeaTable
Now you need to add your Gmail account as a third party in your SeaTable base. To do this, the following steps are necessary:
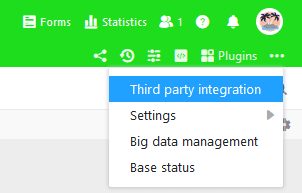
- Open the extended base options by clicking on the three-dot icon in the top right-hand corner.
- Select the item Third party integration.
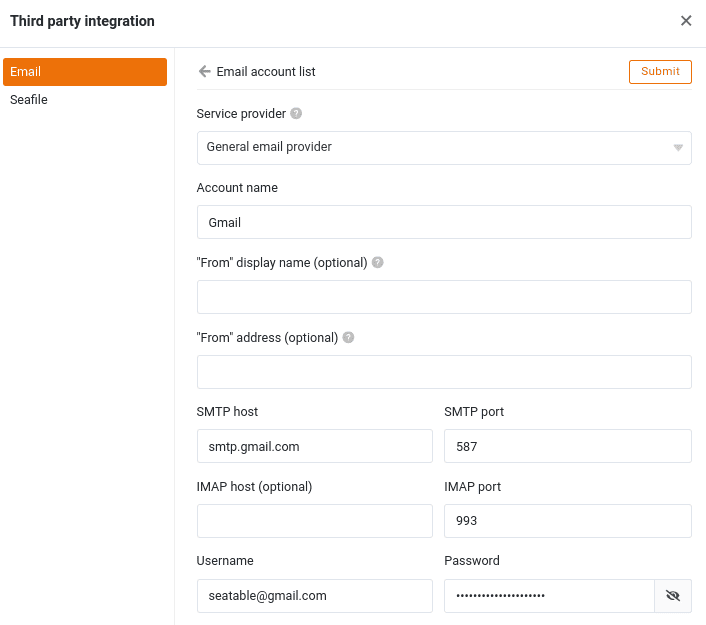
- Click on Add email account.
- Select General email provider as the service provider.
- Enter the following information and then click on the “Submit” button in the upper right corner:
- Account name: any name for the account, e.g. ‘Gmail’
- SMTP server: ‘smtp.gmail.com’
- SMTP port: ‘587’
- Username: Your Gmail address, e.g. ‘seatable@gmail.com ’
- Password: the generated app password from the clipboard
Authentication via OAuth 2.0
OAuth 2.0, short for Open Authorization 2.0, is an open protocol that allows (web) applications secure access to user accounts of other applications. This means that a user can use resources or services of another application from one application, e.g. send emails from SeaTable via Gmail.
In order for SeaTable to access a Gmail account via OAuth 2.0, you must create a client ID and a client key in Google’s Cloud Console and save them in SeaTable.
Creation of access data in the Google Cloud Console
As a platform for developers, the Cloud Console seems confusing for normal users. Don’t let this impress you. With the following step-by-step instructions, anyone can set it up.
- Open the Google Cloud Console and log in to your Google account when prompted.
- First create a new project. All the settings described below are made in this project. Enter a project name (e.g. ‘SeaTable’) and select the storage location. (If no organizations are defined, keep “No organization”).
- Allow the created project to use the Gmail API. To do this, click with the mouse in the search field at the top of the screen, enter “Gmail API” and then click on the corresponding search result. Activate the Google API.
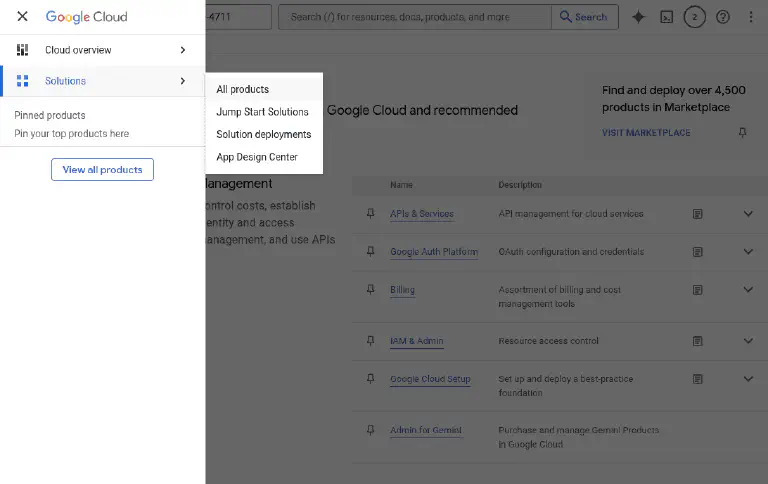
- All further steps take place in the Google Auth Platform. Click on the sandwich icon in the top left-hand corner and then select “All products” in the “Solutions” section. On the product page, click on “Google Auth Platform”.
-
Make the necessary configurations on the Google Auth Platform: Enter an application name, a support and a contact email address (e.g. your Gmail address). Select “External” as the target group. Accept the terms of use and complete the configuration.
-
Click on Audience in the page navigation of the Google Auth Platform. Add your Google email address as a test user.
-
In the page navigation of the Google Auth Platform, click on Clients and create an OAuth 2.0 client. Select “Web application” as the application type for the OAuth client and enter a name (e.g. ‘SeaTable’). Skip the “Authorized JavaScript sources” and add the following URI as “Authorized redirect URI”:
https://cloud.seatable.io/oauth/third-party-email-accounts/callback/If you are not using SeaTable Cloud, replace cloud.seatable.io with the hostname of your SeaTable instance. Scroll to the bottom of the page and confirm the creation of the OAuth client.
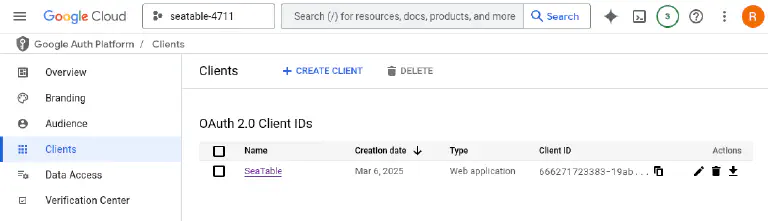
- The newly created client is now displayed in the list of OAuth 2.0 clients. The settings of the client can be displayed by clicking on its name. The displayed client ID and the client key are essential for the following setup in SeaTable.
If you made a mistake during configuration and no longer know where you are, click on the sandwich icon in the top right-hand corner. From there you can navigate back to the Google Auth Platform.
Creation of the email account in SeaTable
Now you need to add your Gmail account as a third party account in your SeaTable base. To do this, the following steps are necessary:
-
Open the extended base options by clicking on the three-dot icon in the top right-hand corner.
-
Select the item Third party integration.
-
Click on Add email account.
-
Select Gmail as the service provider.
-
Enter the following information then click on the “Submit” button in the upper right corner:
- Account name: any name for the account, e.g. ‘Gmail’
- Client ID: the client ID of the created OAuth client
- Client key: the client secret of the created OAuth client
-
Click Continue when you are notified that this app has not been verified and allow access to the Google account.
Send emails via automation
After that, you can use the email account created in your SeaTable base to send emails via automation or button.
If you want to learn more about this useful automation, read the article Email Sending by Automation .