Table of Contents
In this course we will create a simple tool to record and manage your personal or professional expenses. When you’re done, you’ll be able to record expenses at any time, either on your computer or on your cell phone. Every time you pull out your wallet, you should then document this expense. The reward for this effort is that you can see at a glance what you have spent how much money on.
So let’s start this online course by creating the necessary structure to be able to save these outputs. To do this, you will create an initial base and then some columns. You will see that the following steps are almost self-explanatory.
Create new base
We start on the SeaTable start page. Create a new base with the name Expense Tracking button. Then click on this base to go to the base Editor.
Change the name of the first table
By default, each base contains a table with the name Table 1which has a column with three rows .
- Delete the three rows
- Then change the name of the table to
Expenses
Customize the columns of the table and add new ones
Next, we turn to the columns of the table so that our base can record the desired data.
- Change the name of the first column from
NameonReason - Now add three more columns
Column 1:
Name:
DateColumn type:
DateFormat: any
To the minute:
Yes
Note: Instead of the column type
Date the column type
Created time can be used. While you have to fill in the date column manually, this would be filled in automatically with the current date. This of course saves time. However, the disadvantage would be that you would no longer be able to change the date value and, for example, could no longer retroactively enter expenses for other days.
Column 2:
Name:
AmountColumn type:
NumberFormat:
Euro
Column 3:
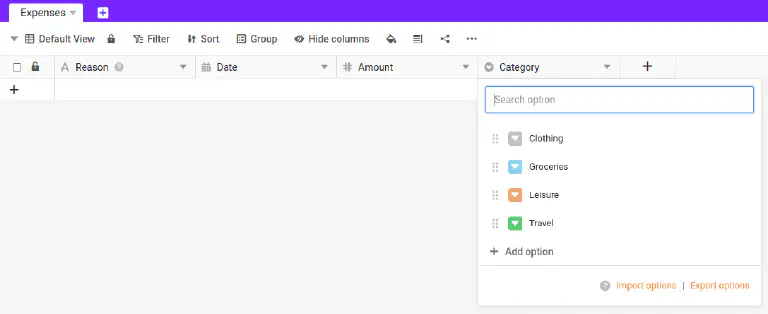
Name:
CategoryColumn type:
Single select
Add single selection options
Your single selection currently has no selection options. Therefore, next create a new selection for the Category the following four options:
- Clothing
- Groceries
- Leisure
- Travel
Short quality check
Fantastic. If you have followed the instructions exactly, your base should now look like this:
Let’s briefly recap what you have just created with just a few mouse clicks: You now have a base in which you can record all your future expenses.
At the same time, by selecting the column types, you have ensured that only the appropriate information can be entered in the columns.
That was step 1 of this online course. Scroll to the end of this article and jump to Step 2: Creating a form.