Table of Contents
Available with Enterprise
Please first log in to SeaTable Cloud and then navigate to the Team Management section. From there, go to Teams > Settings > Single Sign-On.
The information displayed here will be required for your Identity Provider (IdP).
In the displayed URLs, your team ID will be shown instead of xxxx.
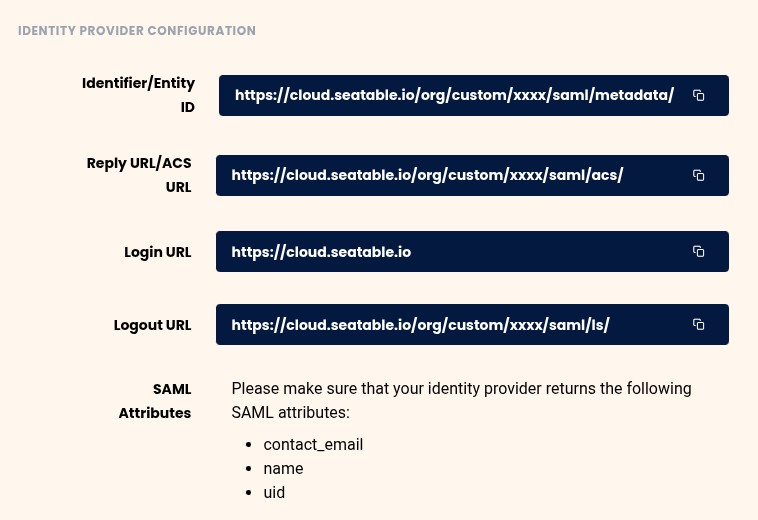
1. Create an application in your Identity Provider (IdP)
- Create a new application in your IdP for SeaTable Cloud.
- Use the URLs provided by SeaTable for:
- Entity ID
- Assertion Consumer Service (ACS) URL
- Login (SSO URL)
- Logout
- Make sure the metadata URL of your IdP is directly accessible and does not redirect to other domains.
2. Define SAML attributes
- Configure transmission of the following required attributes:
contact_email: user’s email addressname: user’s full nameuid: unique and persistent user identifier
3. Upload certificate and metadata URL in SeaTable
- Download the valid SAML certificate from your IdP.
- Upload the certificate and metadata URL to the SeaTable Team Management.
- Select the domain you want to associate with SeaTable Cloud.
4. Verify domain ownership
You will now see a DNS record in Team Management that you must add for the domain you just specified.
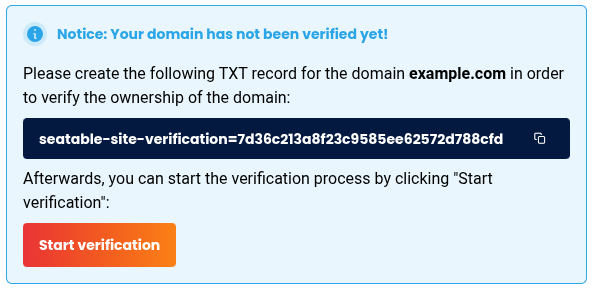
- Add the TXT record provided by SeaTable to your registered email domain’s DNS settings.
- Wait a few minutes; DNS updates can sometimes take several hours.
- Start the domain ownership verification.
- Once verification succeeds, your domain will be linked to your SeaTable Cloud team.
5. Test login via SSO
Test login with a user from the verified domain. If a user account with that email already exists in your team, accounts will be merged.
Currently, team members can log in using either SSO or their previous username and password.
6. Optional: Enforce login via SSO
If login via SSO works reliably, activate the option in Team Management to allow login only via SSO. This will disable previous username/password logins.