Table of Contents
The whiteboard plugin gives you the freedom to graphically visualize processes and structures that you cannot display with the previous plugins. You can also freely sketch layouts and mockups. For the design, you have various elements such as squares, ellipses and arrows as well as tools such as pen, eraser and the text tool to choose from.
You can find out how to activate the plugin in a base here .
Setting options for a whiteboard drawing
By default, a drawing with a blank canvas is already created when you open the whiteboard plugin for the first time. If you would like to create another drawing, click on Add drawing. This opens an input field in which you can enter the desired name.
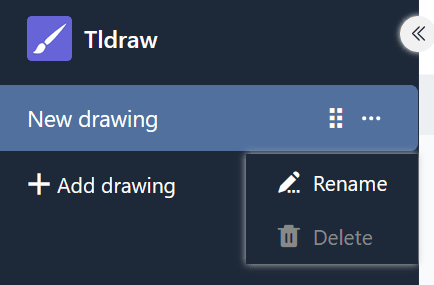
To change the order of the drawings, hold down the left mouse button on the gripping surface and drag and drop the drawing to the desired position. You can also rename and delete the drawings.
Available tools
Various tools and elements are available in the toolbar below the canvas.
Selection tool
You can use this tool to select an element that you want to edit, copy, move or delete. As soon as the element is selected, its respective setting options appear on the left.
Hand tool
Use the hand tool to move the canvas without changing anything on the elements. This also works with the selection tool as soon as you hold down the space bar, or with the mouse wheel in a vertical direction.
Drawing tool (pen)
Hold down the left mouse button to draw different lines and shapes freehand. Each time you release the pen, a new element is created that you can select separately and adjust as required.
You can choose between 12 colors, set the opacity on the slider and select the fill mode. You can also decide whether the strokes should be drawn, dashed, dotted or solid. The line width (S, M, L, XL) can also be adjusted.
Eraser
You can use this tool to erase several elements on the canvas in one go. Hold down the left mouse button while moving the eraser over the elements to be erased.
Arrow tool
Create arrows to relate different elements on the canvas to each other. You have the same setting options for arrows as for drawn lines and shapes, but you can also choose from 8 arrowheads. To bend the arrow, drag its center point.
Text tool
Would you like to place a text or lettering on your canvas? Then simply insert a text element with this tool! Once you have entered the letters, you can set the font color, transparency, font size, font type and text alignment.
Hint tool
With this tool, you can easily place notes on your canvas to highlight important information. Simply click on the canvas where you want to place the note. A text field is already integrated into the element that appears so that you can start writing straight away.
Image tool
You can use the image tool to insert images from your device into the drawing. To do this, select the desired image file in your device’s folder system and confirm with a click.

Mold tool
You can use this tool to add a variety of shapes to your drawing. Select the tool, hold down the left mouse button on the canvas and drag the shape.

You have 20 shapes to choose from, including
- Rectangles, diamonds, parallelograms and trapezoids
- Triangles, pentagons, hexagons and octagons
- Ellipses and ovals
- Stars, clouds and hearts
- Arrows
- Checkboxes
You can also choose between 12 colors, set the opacity on the slider and change the fill mode. You can also decide whether the outlines should be drawn, dashed, dotted or solid. The line width (S, M, L, XL) can also be adjusted.
Line tool
This tool creates lines that connect two points. You can choose between 12 colors, set the opacity on the slider and decide whether the lines should be drawn, dashed, dotted or solid. The line width (S, M, L, XL) can also be adjusted. Drag the center point of the line to create a corner or curve.
Marker
You can use this tool to permanently mark certain areas on the canvas, as you would with a highlighter. You can set the color, transparency and size of the marker.
Laser pointer
This tool is particularly useful for presentations. Use the laser pointer to highlight the areas on the screen that you are currently talking about. It creates a red line that disappears again in a matter of seconds.
Frame tool
Use the frame tool to group individual elements. As soon as the elements in a frame are combined into a group, you can move, copy, lock and delete them together.
Edit elements
You can use the various elements to perform certain actions, which we will now look at in detail.
Insert text into elements
You can insert text into shapes such as rectangles and ellipses as standard. To do this, double-click on the corresponding element and enter the desired text. You then have the same setting options as with the text tool.
Move, rotate, enlarge or reduce elements
Use the selection tool to click on the element that you want to adjust. Move the mouse over the appropriate grab point on the element and drag with the left mouse button pressed to move, rotate, enlarge or reduce the element.
You can also change the zoom level of the canvas in the bottom left-hand corner. However, this only changes the size of the visible section and not the size of the elements.
Duplicate, cut, copy and paste elements
There are three ways to duplicate an element: You can either click on the Duplicate symbol or right-click on the element and select Duplicate or you can use the Shortcut Ctrl +D .
To cut, copy or paste an element, you can right-click on the element and select the desired element in the Context menu select the appropriate option or use the familiar Shortcuts Ctrl +X , Ctrl +C and Ctrl +V use. You can also copy an element to the clipboard as an image file (PNG or SVG).
Move elements to the foreground or background
As several elements can overlap on the canvas, you can move each element one level forwards or backwards or completely into the foreground or background. To do this, either click on the three dots and one of the four arrow symbols at the top left-hand edge or right-click on the element and select the desired option in the context menu.
Link elements
Would you like to add elements (e.g. buttons, images or text) to your drawing that link to specific websites? Then simply link the elements by inserting a URL. To do this, either click on the three dots and the chain symbol at the top left-hand edge or right-click on the element before selecting Edit link in the context menu.
As soon as the element is linked, a link icon appears at the top right of the element. Click on it to open the URL. Of course, you can edit the URL later in the same way or delete it from the input field.
Locking elements
If you want to work on the canvas without accidentally moving or changing certain elements, you can lock the elements. To do this, right-click on the element and select the Lock option. To unlock locked elements, proceed in the same way.
Delete elements
If you want to delete an element, there are several options: You can either click on the Trash icon or right-click on the element and select Delete or use the buttons Backspace or Del .
To quickly and accurately remove several elements from the canvas, you can also use the eraser from the toolbar.
You can use the arrow icons at the top left-hand edge to select only the last steps. undo or Restore. You can also use the familiar shortcuts Ctrl +Z and Ctrl +Shift +Z use.
Screen settings
In the whiteboard plugin, you can make settings for the entire canvas in addition to the settings for the individual elements. To do this, use the burger menu (the three horizontal lines) in the top left-hand corner. We will introduce you to some useful functions below.
- If you want to show a grid to align the elements on the canvas precisely, select Show grid.
- If you also activate Always align with other elements, intelligent guides appear to align the elements with each other.
- In focus mode, the toolbar and all icons and menus on the canvas are hidden. When selecting elements, the element settings do not open either, so you can click across the canvas and arrange elements without being disturbed.
- With Select all, you can select all elements on the canvas at the same time. This is useful, for example, if you want to lock all elements before a presentation so that you cannot accidentally change anything. You can then easily unlock them all again.
Set language
To make your work as easy as possible, the whiteboard plugin offers you a much wider choice of languages than the SeaTable user interface. Click on the burger menu (the three horizontal lines), set your language and all labels will be translated.
Switch between light and dark mode
You can also specify whether you want to use the whiteboard in light or dark mode. To do this, click on the burger menu (the three horizontal lines) and select the desired mode at the bottom of the settings.
List of all shortcuts
You can find a clear list of all shortcuts by clicking on the burger menu (the three horizontal lines) and then on Keyboard shortcuts.
Export elements
You can save a drawing to your hard disk by exporting the elements from a canvas. To do this, click on the burger menu (the three horizontal lines) and select Export all as. You can use the slider to specify whether the background should be transparent. As soon as you click on SVG or PNG, the corresponding image file will be downloaded. You can also select individual elements and export them as PNG or SVG.